Hey there, fashionistas! Looking to add a trendy and edgy piece to your wardrobe? Well, look no further because today we’re going to dive into the world of DIY fashion and learn how to make a shredded crop top. This funky and versatile garment is perfect for adding a touch of rebellious style to any outfit. So, grab your scissors and let’s get shredding!
Now, before you start picturing a chaotic mess of fabric, let me assure you that creating a shredded crop top is much easier than it sounds. With just a few simple steps, you’ll be able to transform an old t-shirt or crop top into a unique and fashionable masterpiece. Whether you’re going for a grunge-inspired look or want to make a statement at your next music festival, this DIY project is sure to unleash your inner fashionista. So, let’s dive in and learn the art of shredding!
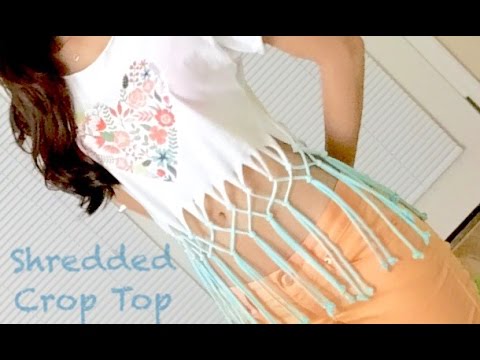
How to Make a Shredded Crop Top
Step 1: Start by choosing a plain crop top in a fabric of your choice.
Step 2: Lay the crop top flat on a table or cutting board and use a fabric marker to draw lines where you want the shredding to occur.
Step 3: Take a pair of sharp scissors and carefully cut along the marked lines, creating evenly spaced slits.
Step 4: Gently pull and stretch the fabric around the slits to create a shredded effect.
Step 5: Repeat steps 2-4 until you achieve the desired level of shredding.
Step 6: Wash and dry the crop top to further enhance the shredded look.
With these simple steps, you can transform a plain crop top into a trendy and unique shredded crop top of your own!
How to Make a Shredded Crop Top: A DIY Guide
If you’re looking to add some edgy style to your wardrobe, a shredded crop top is the perfect choice. This trendy and versatile piece can be dressed up or down, making it a must-have for fashion-forward individuals. In this article, we will guide you through the process of creating your own shredded crop top, allowing you to customize it to your unique style and preferences. So grab your scissors and let’s get started!
Gather the Materials
Before you begin, it’s important to gather all the necessary materials. Here’s what you’ll need:
– A plain crop top: Choose a crop top in a color and fabric of your choice. Make sure it fits well and is comfortable to wear.
– Scissors: Opt for a pair of sharp fabric scissors to ensure clean cuts and precision.
– Chalk or fabric marker: This will be used to mark the areas you want to cut or shred.
– Ruler or measuring tape: This will help you create even and symmetrical cuts.
– Optional: Needle and thread or sewing machine, if you want to secure the edges or add extra embellishments.
Step 1: Determine the Length
Start by deciding how short you want your crop top to be. Use a ruler or measuring tape to measure the desired length from the bottom hem of the top. Mark this point with chalk or a fabric marker. Remember to leave some extra fabric for the shredding process.
Step 2: Create the Shredded Design
Now it’s time to get creative and start shredding! Use your scissors to make small vertical cuts along the bottom of the crop top, starting from the marked point. These cuts can be as long or as short as you like, depending on the level of shredding you want.
Tip:
To achieve a more distressed and rugged look, you can also make horizontal cuts across the vertical ones. This will create a grid-like pattern that can be further shredded for added texture.
Step 3: Shred and Distress
Once you’ve made the initial cuts, it’s time to start shredding. Use your fingers to pull and twist the fabric, creating frayed edges and a distressed look. This is where you can let your creativity shine by experimenting with different shredding techniques and patterns.
Step 4: Secure the Edges (Optional)
If you want to ensure that the shredded sections stay in place, you can choose to secure the edges with a needle and thread or a sewing machine. Simply stitch along the edges of the cuts to prevent them from unraveling. This step is especially useful if you plan on washing your crop top frequently.
Step 5: Personalize Your Crop Top
Now that you’ve completed the shredding process, it’s time to add some personal touches. You can further customize your crop top by:
– Adding embellishments: Consider sewing on beads, sequins, or patches to enhance the overall look of your top.
– Dyeing or bleaching: Experiment with different dyeing or bleaching techniques to create a unique color or pattern.
– Layering: Pair your shredded crop top with a contrasting tank top or bralette for added dimension and style.
Step 6: Rock Your Shredded Crop Top
Congratulations, you’ve successfully created your own shredded crop top! Now it’s time to show off your DIY masterpiece. Pair it with high-waisted jeans, a skirt, or shorts for a trendy and fashionable outfit. Don’t be afraid to experiment with different accessories and footwear to complete your look.
Benefits of Making Your Own Shredded Crop Top:
– Customization: Making your own shredded crop top allows you to tailor it to your specific style preferences, ensuring a unique and personalized garment.
– Cost-effective: Creating your own shredded crop top is a budget-friendly alternative to purchasing one from a store. You can upcycle an old crop top or choose an affordable plain one to transform into a trendy fashion piece.
Tips for a Successful DIY Shredded Crop Top:
– Start with a well-fitted crop top: Ensuring a good fit will enhance the overall look and comfort of your shredded crop top.
– Practice on scrap fabric: If you’re new to shredding and distressing techniques, it’s a good idea to practice on scrap fabric before working on your actual crop top. This will give you a better understanding of the process and help you achieve the desired result.
Creating your own shredded crop top is a fun and creative way to elevate your style. By following these steps and adding your personal flair, you’ll have a unique and fashionable piece that is sure to turn heads. So grab your materials, unleash your creativity, and get ready to rock your shredded crop top with confidence!
Key Takeaways: How to Make Shredded Crop Top?
- Choose a plain crop top for the base.
- Gather the necessary materials: scissors, sandpaper, and a marker.
- Mark the areas where you want the shredding to be.
- Cut thin strips along the marked areas using scissors.
- Distress the edges of the strips with sandpaper for a worn look.
Frequently Asked Questions
What materials do I need to make a shredded crop top?
To make a shredded crop top, you will need the following materials:
– A plain crop top
– Scissors
– A ruler or measuring tape
– Chalk or fabric marker
– Sandpaper or a nail file
– Optional: studs, rhinestones, or other embellishments
How do I choose the right crop top for shredding?
When choosing a crop top to shred, look for one made of a sturdy fabric like cotton or denim. Avoid tops made of stretchy or delicate materials, as they may not hold up well to the shredding process. Additionally, consider the fit of the crop top – a looser fit will allow for more dramatic shredding, while a tighter fit may require more precise cutting.
It’s also a good idea to choose a crop top in a color that will complement your wardrobe and personal style. Neutral colors like black or white are versatile and easy to pair with different outfits, while bold colors or prints can add a pop of personality to your look.
How do I create the shredded effect on the crop top?
To create the shredded effect on your crop top, start by laying it flat on a clean surface. Use a ruler or measuring tape to mark the areas where you want to create the shredding. You can create vertical or horizontal cuts, or a combination of both, depending on the desired look.
Next, use a pair of scissors to make small slits along the marked areas. Start with smaller cuts and gradually increase the length for a more natural and textured look. If you want a more distressed look, you can also use sandpaper or a nail file to rough up the edges of the cuts.
Can I add embellishments to my shredded crop top?
Yes, you can add embellishments to your shredded crop top to customize it further. Studs, rhinestones, or other decorative elements can be added to the shredded areas for a unique and personalized touch. Use fabric glue or a needle and thread to attach the embellishments securely. Be creative and experiment with different designs and placements to make your shredded crop top truly stand out.
Remember to consider the washability of the embellishments – if you plan on machine-washing your crop top, choose embellishments that can withstand the washing process without coming loose or getting damaged.
How should I care for my shredded crop top?
To care for your shredded crop top, it’s best to hand wash it or use a gentle cycle on your washing machine. Turn the top inside out before washing to protect the shredded areas. Use a mild detergent and cold water to prevent color fading or bleeding.
After washing, reshape the shredded areas if needed and lay the crop top flat to dry. Avoid wringing or twisting the fabric, as this can distort the shredded design. Once dry, you can lightly iron the crop top on a low setting if necessary.
Easy Shredded T-shirt Tutorial (No-sew!)
Final Thoughts
So there you have it, a step-by-step guide on how to make your very own shredded crop top! It’s a fun and trendy way to upcycle your old t-shirts and create a stylish piece of clothing that is uniquely yours. By following these simple instructions, you can transform an ordinary shirt into a fashion statement that will turn heads wherever you go.
Remember, the key to achieving the perfect shredded look is to be creative and experiment with different cutting techniques. Don’t be afraid to get a little wild and let your imagination run free. Whether you prefer a subtle shredded effect or a more dramatic look, the choice is yours.
Not only is making a shredded crop top a fun DIY project, but it also allows you to express your individual style and reduce waste by repurposing old clothing. So why not give it a try? Grab some scissors, gather your friends, and have a blast creating your own one-of-a-kind shredded crop top that will make you feel like a fashion icon. Get ready to rock your new creation with confidence and show off your unique sense of style!
Remember, if you ever need more inspiration or guidance, you can always come back to this article as your go-to resource. Happy crafting and happy shredding!