If you’re a breastfeeding mom, you know how essential a good pumping bra is. But what if you don’t want to spend a lot of money on one? Or maybe you just can’t find the right size or style that fits you comfortably. Well, the good news is that you can easily make a pumping bra from a sports bra!
In this article, we’ll show you how to take a regular sports bra and modify it to work as a pumping bra. Not only is this a budget-friendly option, but it also allows you to customize the fit and style to your liking. So let’s get started and learn how to make a pumping bra from a sports bra!
- Get a sports bra that fits you well and has a strong elastic band at the bottom.
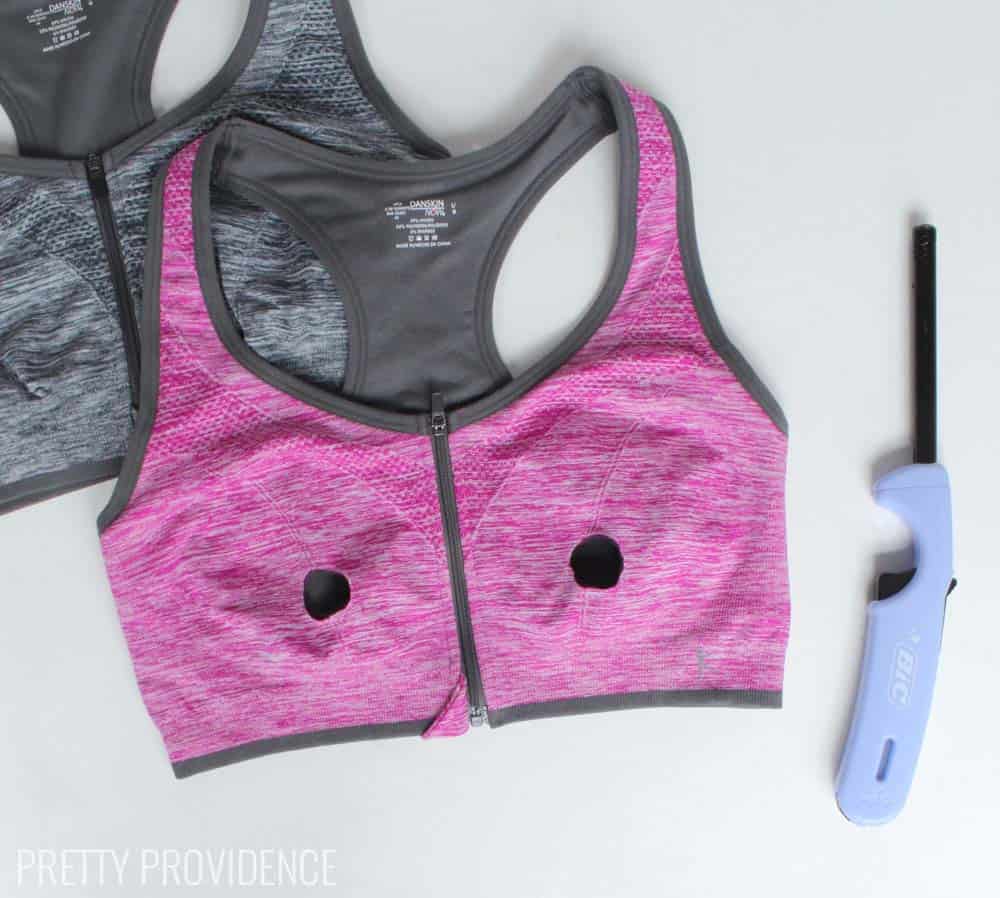
- Cut two small holes in the front of the bra where your nipples are located.
- Attach your breast pump flanges to the holes in the bra.
- Adjust the bra to make sure the flanges are centered over your nipples.
- You now have a hands-free pumping bra made from a sports bra!
How to Make a Pumping Bra From a Sports Bra?
If you’re a breastfeeding mom who needs to pump milk regularly, you know how important it is to have a comfortable and functional pumping bra. However, buying a pumping bra can be expensive, and you may not always find one that fits your specific needs. That’s why making your own pumping bra from a sports bra can be a cost-effective and customized solution. In this article, we’ll show you how to make a pumping bra from a sports bra in 10 easy steps.
Step 1: Choose a Sports Bra
The first step in making a pumping bra from a sports bra is choosing the right sports bra. Look for a sports bra that fits well and provides enough support. The bra should be made of stretchy fabric so that it can accommodate the breast pump flanges.
Fitting Tips:
- Choose a sports bra that fits snugly around your chest but is not too tight.
- Avoid bras with underwire, as they can interfere with milk flow and cause discomfort.
- Consider buying a sports bra with adjustable straps, so you can adjust the fit as needed.
Step 2: Cut Small Holes in the Bra Cups
Once you’ve chosen a sports bra, it’s time to make small holes in the bra cups where the breast pump flanges will go. Use a pair of scissors to cut small slits in the fabric, just big enough to fit the flanges snugly.
Tip:
Make sure the holes are in the right place so that the flanges will be centered over your nipples.
Step 3: Reinforce the Holes
To prevent the holes from stretching or tearing, reinforce them with a piece of fabric or elastic. Cut a small piece of fabric or elastic and sew it around the holes, making sure that it covers the edges of the holes.
Tip:
You can use a zigzag stitch or a straight stitch to sew the fabric or elastic around the holes.
Step 4: Attach Straps to the Bra Cups
Next, you’ll need to attach straps to the bra cups to hold the breast pump flanges in place. Cut two pieces of elastic or fabric and sew them to the top of each bra cup. These straps should be long enough to wrap around the breast pump flanges and hold them securely.
Tip:
Make sure the straps are not too tight, as they can interfere with milk flow.
Step 5: Add an Extra Layer of Fabric
To make the pumping bra more comfortable and supportive, you can add an extra layer of fabric to the front of the bra cups. Cut a piece of fabric that is slightly larger than the bra cups and sew it to the front of the bra cups.
Tip:
Choose a soft and breathable fabric like cotton or bamboo to avoid irritation and discomfort.
Step 6: Create an Opening in the Back
To make it easy to put on and take off the pumping bra, you’ll need to create an opening in the back. Cut a slit in the back of the bra, just below the straps. You can use a piece of elastic or fabric to create a closure for the opening.
Tip:
Make sure the opening is large enough to fit over your head comfortably.
Step 7: Test the Bra
Once you’ve finished making the pumping bra, it’s time to test it out. Put on the bra and attach your breast pump flanges to the straps. Make sure the flanges are centered over your nipples and that they fit snugly into the holes you’ve made.
Tip:
Adjust the straps and the opening in the back as needed for a comfortable fit.
Step 8: Customize the Bra
If you’re not satisfied with the fit or function of the pumping bra, you can customize it further. For example, you can add extra layers of fabric for more support, or you can adjust the straps for a better fit.
Tip:
Experiment with different fabrics and designs to find the perfect pumping bra for your needs.
Step 9: Wash the Bra
Before using the pumping bra, make sure to wash it in cold water and hang it to dry. This will help to remove any dirt or bacteria that may be on the fabric.
Tip:
Wash the bra after each use to keep it clean and hygienic.
Step 10: Enjoy Your Pumping Bra!
Congratulations, you’ve successfully made your own pumping bra from a sports bra! Now you can enjoy a comfortable and functional pumping experience without breaking the bank.
Benefits of Making Your Own Pumping Bra:
- Cost-effective solution compared to buying a pumping bra
- Customizable to fit your specific needs and preferences
- Fits well and provides enough support for the breast pump flanges
Conclusion:
Making a pumping bra from a sports bra is a simple and affordable solution for breastfeeding moms who need to pump milk regularly. With just a few basic materials and some basic sewing skills, you can create a customized and comfortable pumping bra that fits your specific needs. So why not give it a try and enjoy a more comfortable and efficient pumping experience?
Frequently Asked Questions
Here are some commonly asked questions about creating a pumping bra from a sports bra:
1. What do I need to make a pumping bra from a sports bra?
To make a pumping bra from a sports bra, you will need a few supplies. You will need a sports bra that fits you well and that you don’t mind altering, some scissors, a needle and thread, and two nursing clips. You can find nursing clips at most craft stores or online.
Once you have all of your supplies, you can start altering your sports bra to make it into a pumping bra that will work for you.
2. How do I alter my sports bra to make it into a pumping bra?
To alter your sports bra and turn it into a pumping bra, you will need to cut two small holes in the bra where your nipples are located. Make sure the holes are big enough to fit your breast shields through, but not so big that they won’t hold the shields in place.
Next, you will need to sew the nursing clips onto the bra straps. To do this, simply thread a needle with some thread that matches the color of your bra and sew each clip onto the strap. Make sure the clips are facing the right way and are secure.
3. Can I use any sports bra to make a pumping bra?
While you can technically use any sports bra to make a pumping bra, it’s best to choose a bra that is supportive and fits you well. You don’t want a bra that is too loose, as it won’t hold the breast shields in place properly, but you also don’t want a bra that is too tight, as it may be uncomfortable to wear for long periods of time.
Choose a bra that is made of a stretchy, breathable material and that has enough structure to hold the breast shields in place. Some sports bras may work better than others, so it may take some trial and error to find the right one for you.
4. How do I clean my pumping bra?
It’s important to clean your pumping bra regularly to keep it hygienic and in good condition. To clean your pumping bra, simply hand wash it in warm water with a mild detergent. Rinse it thoroughly and hang it up to dry.
Don’t put your pumping bra in the dryer, as this can damage the nursing clips and the fabric of the bra. It’s also a good idea to have a few pumping bras on hand so that you can rotate them and always have a clean one available.
5. Can I wear my pumping bra as a regular sports bra?
While you can technically wear your pumping bra as a regular sports bra, it’s not recommended. The holes you cut in the bra may be visible and the nursing clips may not be comfortable to wear during a workout.
It’s best to reserve your pumping bra for its intended use and wear a separate sports bra for exercise or other activities.
NEVER BUY ANOTHER PUMPING BRA!| 2 ways to DIY yourself for under $20| Easy Hands free breast pumping
In conclusion, transforming a sports bra into a pumping bra is an easy and economical option for breastfeeding mothers. Not only does it provide a comfortable fit, but it also allows for discreet and convenient pumping on the go.
By following the simple steps outlined in this guide, you can create a customized pumping bra that suits your individual needs. Whether you’re a busy working mom or a stay-at-home parent, having a pumping bra in your breastfeeding toolkit can make all the difference.
So go ahead and give this DIY project a try. You’ll be amazed at how simple and effective it can be in helping you maintain your breastfeeding journey with ease and comfort. Happy pumping!