Are you ready to turn your old top into a trendy crop top? If you’re looking to revamp your wardrobe without spending a fortune, then learning how to cut a top into a crop top is the perfect DIY project for you. Not only will you save money, but you’ll also have a unique and stylish piece that you can proudly show off to your friends. So, grab your scissors and let’s get started on this fun and fashionable transformation!
Cutting a top into a crop top is a simple and fun way to give new life to an old garment. Whether you want to update a basic tee or transform a button-down shirt, this DIY project is all about unleashing your creativity and personal style. With just a few easy steps, you can create a trendy crop top that’s perfect for summer days or nights out with friends.
In this article, we’ll guide you through the process of cutting a top into a crop top, providing you with step-by-step instructions and helpful tips along the way. We’ll cover everything from choosing the right top to measuring and cutting it to perfection. By the end, you’ll have a stylish and unique crop top that will make heads turn wherever you go. So, let’s dive in and get ready to rock your new crop top with confidence!
How to Cut a Top Into a Crop Top:
- Start by choosing a top that you want to turn into a crop top.
- Measure the length you want for your crop top, considering your personal style and comfort.
- Mark the desired length on the top with a fabric marker or pins.
- Use sharp fabric scissors to carefully cut along the marked line, ensuring a straight and clean cut.
- If you want a frayed edge, gently pull the cut edges to create a distressed look.
- Try on the crop top and make any necessary adjustments to the length.
- Finally, pair your new crop top with high-waisted jeans or a skirt for a stylish and trendy look.
How to Cut a Top Into a Crop Top?
Are you tired of your old tops and want to give them a trendy new look? One popular style that has been making waves in the fashion world is the crop top. Crop tops are versatile, stylish, and perfect for the warmer months. If you’re wondering how to transform your regular top into a crop top, you’ve come to the right place. In this article, we will guide you through the process of cutting a top into a crop top, step by step. Get ready to revamp your wardrobe and rock the crop top trend!
1. Gather Your Materials
Before you start cutting, make sure you have all the necessary materials. Here’s what you’ll need:
– A top that you want to turn into a crop top
– Fabric scissors
– Measuring tape or ruler
– Chalk or fabric marker
– Pins
– Optional: sewing machine or needle and thread
Measuring and Marking
The first step in cutting a top into a crop top is measuring and marking where you want the crop top to end. Put on the top and decide how much length you want to remove. Keep in mind that crop tops typically end just above the belly button or at the narrowest part of your waist. Use the measuring tape or ruler to measure the desired length and mark it with chalk or a fabric marker.
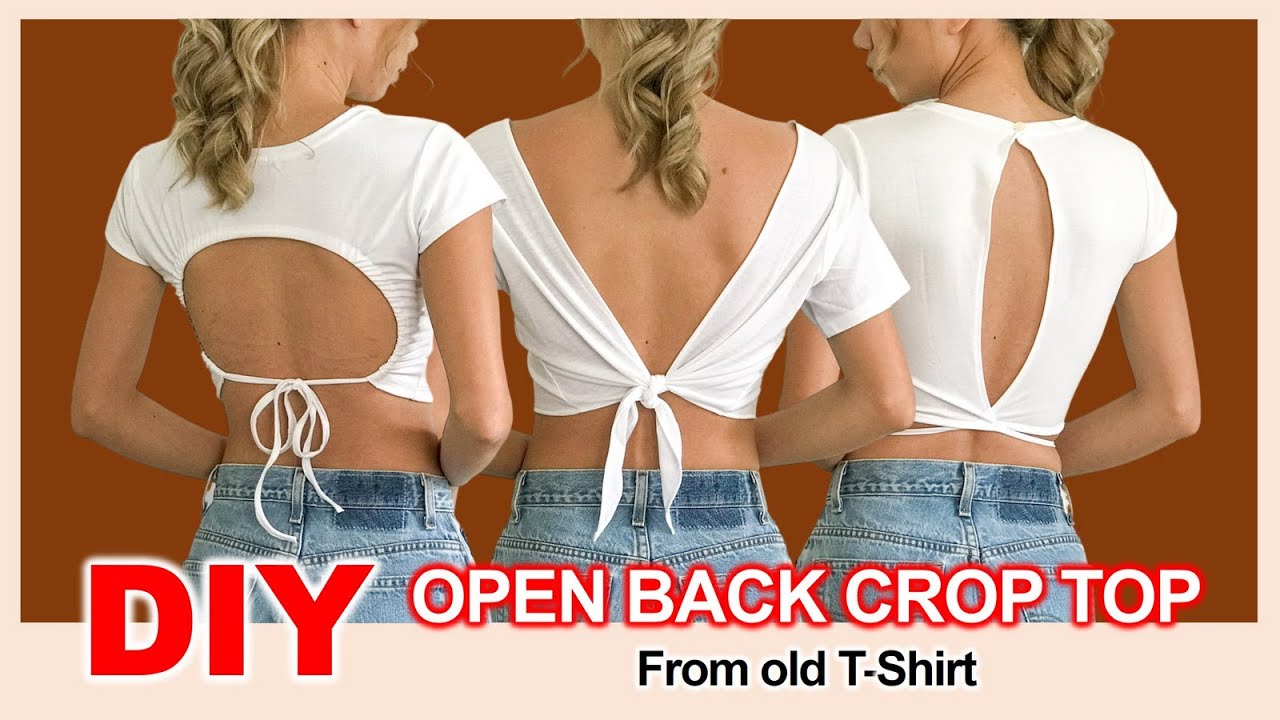
Once you’ve marked the length, it’s time to decide on the shape of your crop top. You can go for a straight cut, a curved hem, or even a tie-front design. Draw the desired shape using the chalk or fabric marker, making sure to follow the marked length. You can also use pins to secure the fabric in place before cutting.
Cutting the Top
Now that you have your markings, it’s time to cut the top. Use fabric scissors to carefully cut along the marked lines. Take your time and make sure to follow the lines accurately. If you’re using pins to secure the fabric, remove them as you cut.
Once you’ve made the initial cut, try on the top to see if you’re happy with the length. If you want to make any adjustments, now is the time to do so. Remember, it’s always better to cut less initially and then make it shorter if needed.
2. Finishing Touches
After you’ve cut your top into a crop top, it’s important to give it a finished look. There are a few ways you can do this:
– If you want a clean and polished edge, you can hem the bottom of the crop top. Fold the raw edge inside, pin it in place, and sew along the edge using a sewing machine or needle and thread. This will prevent the fabric from fraying and give your crop top a professional finish.
– If you prefer a more casual and effortless look, you can leave the raw edge as it is. This works especially well for fabrics that don’t fray easily, like knits or jersey. Just make sure to give the edges a gentle tug to encourage a rolled or distressed effect.
– Another option is to add embellishments or details to your crop top. You can sew on lace trim, add embroidery, or even experiment with fabric paint or patches. Get creative and make your crop top unique to your style!
3. Styling Your Crop Top
Now that you have your newly transformed crop top, it’s time to style it! Crop tops can be paired with a variety of bottoms to create different looks. Here are a few ideas to get you started:
– High-waisted jeans or shorts: This classic combination is perfect for a casual and effortless look. The high-waisted bottoms will balance out the cropped length of the top and create a flattering silhouette.
– Skirts: Whether it’s a flowy maxi skirt or a fitted pencil skirt, pairing it with a crop top can create a chic and stylish outfit. Play with different lengths and fabrics to find your perfect combination.
– Layering: If you’re not comfortable showing too much skin, you can always layer your crop top over a tank top or a lightweight blouse. This adds an extra dimension to your outfit and allows you to wear your crop top in different settings.
Remember, confidence is key when rocking a crop top. Embrace your body and style it in a way that makes you feel comfortable and empowered.
4. Caring for Your Crop Top
To ensure your crop top stays in great condition, it’s important to follow the care instructions for the fabric. Most tops can be machine washed, but delicate fabrics may require handwashing or dry cleaning. Always check the care label before washing.
If you’ve hemmed the bottom of your crop top, make sure to check the stitching periodically to ensure it doesn’t come undone. If you notice any loose threads, simply reinforce the stitching with a few extra stitches.
In conclusion, cutting a top into a crop top is a fun and easy way to give your wardrobe a trendy update. With just a few simple steps, you can transform your old tops into stylish and versatile crop tops. Remember to gather your materials, measure and mark the desired length, cut carefully, and add finishing touches to achieve the look you want. Don’t forget to style your new crop top with confidence and care for it properly to make it last. Get ready to turn heads and rock the crop top trend!
Key Takeaways: How to Cut a Top Into a Crop Top?
- Choose a top that you want to turn into a crop top.
- Measure and mark the desired length for your crop top.
- Cut along the marked line using sharp fabric scissors.
- Try on the crop top and make any adjustments if needed.
- Finish the raw edge with a sewing machine or by hand stitching.
Frequently Asked Questions
Q: What materials do I need to cut a top into a crop top?
To cut a top into a crop top, you will need the following materials:
– A top that you want to transform into a crop top
– Scissors
– A ruler or measuring tape (optional)
– Pins (optional)
– Fabric marker or chalk (optional)
These materials will help you achieve a clean and precise cut for your crop top.
Q: How do I choose the right length for my crop top?
The length of your crop top is a personal preference, but there are a few factors to consider when choosing the right length:
– Your body type: If you have a shorter torso, a slightly shorter crop top may be more flattering. If you have a longer torso, you can experiment with different lengths.
– The occasion: For a casual look, you can go for a shorter crop top. For a more formal or conservative setting, a longer crop top may be more appropriate.
– Comfort: Make sure you choose a length that you feel comfortable wearing. If you’re unsure, you can always start with a longer length and gradually cut it shorter if desired.
Q: How do I measure and mark the length for cutting?
Before cutting your top, you may want to measure and mark the desired length to ensure an even cut. Here’s how:
1. Put on the top and stand in front of a mirror.
2. Use a ruler or measuring tape to determine the desired length from the bottom of the top.
3. Use a fabric marker or chalk to make small marks at regular intervals along the desired length.
4. Connect the marks to create a cutting line.
Remember to double-check the length before cutting to avoid any mistakes.
Q: How should I cut the top to turn it into a crop top?
To cut a top into a crop top, follow these steps:
1. Lay the top flat on a surface.
2. Use scissors to cut along the marked cutting line, starting from one side and moving towards the other.
3. Take your time and cut slowly to ensure a clean and straight line.
4. Once you have cut along the entire line, try on the top to check the length. If it’s too long, you can always trim it further.
Remember to be cautious when cutting and take breaks if needed. It’s better to cut a little at a time than to cut too much and regret it later.
Q: How can I finish the edges of my crop top?
After cutting your top into a crop top, you may want to finish the edges for a polished look. Here are a few options:
– Hemming: Fold the raw edge of the fabric to the inside and sew it in place using a sewing machine or needle and thread.
– Fraying: If you prefer a more casual and relaxed look, you can leave the edges raw and let them fray naturally over time.
– Binding: Attach a strip of fabric or bias tape to the raw edge to create a finished look. Sew or glue the binding in place.
Choose the method that best suits your style and sewing skills. Don’t be afraid to experiment and get creative with the finishing touches of your crop top.
Cut a shirt shorter – DIY crop top tutorial – Make a tshirt into a crop top – Cutting only
Final Summary: Turn Heads with a DIY Crop Top
So, there you have it! You’ve learned the art of transforming a regular top into a trendy crop top, and now you’re ready to rock the fashion scene with your DIY skills. Cutting a top into a crop top is not only a fun and creative way to upgrade your wardrobe, but it also allows you to customize your outfits and showcase your unique style. Whether you’re going for a casual and effortless look or a chic and edgy vibe, a crop top can instantly elevate any outfit.
Remember, safety first! Before you start snipping away, make sure you have the right tools and take the necessary precautions. Measure twice, cut once, and don’t be afraid to experiment with different lengths and styles. And don’t worry if it’s not perfect on your first try – practice makes perfect!
Now that you know how to cut a top into a crop top, the possibilities are endless. Get creative, have fun, and let your imagination run wild. Whether you’re heading to a music festival, a beach party, or simply want to add some flair to your everyday wardrobe, a crop top is a versatile piece that can be dressed up or down. So go ahead and give it a try – you’ll be turning heads and making a fashion statement in no time!
Remember, fashion is all about expressing yourself and feeling confident in what you wear. So embrace your inner fashionista, unleash your creativity, and let your crop top creations shine. Get ready to step out in style and show the world your unique fashion sense. Happy crop top cutting!